
6'×3' Kitchen Island Size for Homeowners: Aisle Math & Mock up Test


For most kitchens, aim for a 6’ × 3’ island with 36 to 42 inches of depth, surrounded by 42-inch work aisles. That single footprint handles seating, storage, and prep for the majority of American homes. Smaller kitchens do better with a 4’ × 2’ cart or a peninsula instead of forcing a full island into a tight room. The sections below walk through the clearance math, seating rules, and a simple mock-up test to confirm your numbers before anyone touches stone or plywood.
TL;DR:
Islands larger than 6’ × 3’ are best suited for open-plan kitchens with multi-function use, while smaller kitchens should opt for carts or peninsulas.
A 36-inch minimum clearance around the island is essential, but 42 to 48 inches is preferable to accommodate appliance doors and multiple cooks comfortably.
Seating requires at least 12 to 15 inches of overhang and 22 to 24 inches per seat, with island length driven by desired number of stools.
Utilities such as outlets, plumbing, and ventilation must be planned early, with dedicated circuits and proper clearance to avoid costly retrofits.
Testing the full-scale footprint with tape and a foldable table before finalizing materials prevents cramped layouts and reveals practical clearance issues.
Table of Contents
What Is the Right Kitchen Island Size for Your Kitchen?
Island sizing breaks into three practical tiers, and matching your kitchen to the right one saves you from an expensive redo.
A small island, roughly 4’ × 2’, works best as a rolling prep cart or a narrow fixed island in a galley or compact kitchen. It rarely supports permanent seating and shouldn’t try to. A medium island, around 6’ × 3’, is the workhorse size for most homes, comfortably seating two to three people while still leaving room for storage and a real prep surface. A large island, 8’ × 4’ or bigger, earns its footprint in open-plan kitchens where it needs to carry seating, a sink, a cooktop, or all three at once.
Island size | Typical footprint | Best use |
Small | 4’ × 2’ | Prep cart, no fixed seating |
Medium | 6’ × 3’ | Seating for 2 to 3, storage, prep |
Large | 8’ × 4’+ | Seating, appliances, sink or cooktop |
The sweet spot for most homeowners sits between 36 and 42 inches deep and 6 to 7 feet long, according to sizing benchmarks from Fabuwood’s kitchen island size guide. That depth gives you enough counter for a cutting board on one side and a stool on the other without either feeling cramped.
Small kitchens under 150 square feet: consider a cart or peninsula instead of a fixed island.
Medium kitchens: 6’ × 3’ is close to a default choice.
Large open-plan kitchens: 8’ × 4’ or larger supports multi-function use.
Clearance and Aisle Math: The Numbers That Decide if It Fits
Clearance is where most island plans fail, not because the island itself is wrong, but because nobody accounted for how people and appliance doors actually move through the space.
Industry guidance sets 36 inches as the absolute minimum walking clearance around an island. That number climbs to 42 inches for a single-cook kitchen and 48 inches when two people work at once, plus 44 inches behind any seating where people need to pass through while someone’s eating. Those aren’t arbitrary buffers. A 36-inch aisle looks fine on paper until a refrigerator door swings open and eats 25 inches of it, leaving barely enough room to squeeze past.
Start with your appliance door swings. A refrigerator door alone can consume so much of a 36-inch aisle that designers often push for 48 inches wherever a fridge door opens into it.
Add your island depth (commonly 36 to 42 inches) to your aisle clearance on both sides, plus counter depth on the perimeter run, to get total required room width.
Apply the 13-foot rule: for a 3-foot-deep island with 42-inch aisles on each side, you need roughly 13 feet of clear room width wall to wall.
Pro Tip: Measure your narrowest appliance door swing, not your widest wall. A kitchen can look 14 feet wide and still fail the aisle test if a dishwasher or oven door opens into the main walkway.
Seating, Overhangs, and Island Height That Actually Work
Standard island height is 36 inches, matching your counters, though many homeowners raise a section to 42-inch bar height for a more casual seating feel. Custom heights make sense when the island doubles as a baking station (lower, around 34 inches) or a stand-up bar for entertaining.
Seating comfort comes down to three numbers working together, not just how long the island is.
Overhang: 12 to 15 inches minimum for knee room, per seating guidelines from Northwest Renovate.
Per-seat width: 22 to 24 inches minimum, 24 to 26 inches for comfortable elbow room.
Stool count: a 6-foot island fits three seats comfortably; you need close to 8 feet to fit four without people bumping elbows.
Seating often ends up dictating the whole island length more than storage does. If dining matters to your household, size the seats first and let storage fill in around them.
Outlets, Plumbing, and Ventilation for Island Utilities
An island with real countertop space needs power, and code generally calls for a GFCI outlet within the first 9 square feet, then additional outlets for each 18 square feet beyond that. Any built-in appliance, from a wine fridge to a cooktop, needs its own dedicated circuit rather than sharing one with the counter outlets.
Plumbing: an island sink means running drain lines and vent stacks under the floor, which is far easier to plan before the slab or subfloor is finished than after.
Ventilation: an island cooktop usually needs a downdraft vent or a ceiling-mounted hood, both of which affect ceiling framing and how tall the island can be.
Coordination: bring your electrician and plumber into the conversation while the footprint is still on paper, not after cabinets are ordered.
Outlets and service lines are frequently an afterthought, and that’s exactly what forces a footprint change midway through a project.
Sizing by Kitchen Area: The 10% Rule and the Mock-Up Test
A dependable sanity check is the 10% rule: your island’s footprint should generally stay under about 10% of your kitchen’s total square footage. A 300-square-foot kitchen, for instance, comfortably supports an island around 30 square feet, close to that 6’ × 5’ large-island range, without dominating the room.
Measure your kitchen’s total width and subtract perimeter cabinet depth (usually 24 to 25 inches) on each wall that faces the island.
Subtract your required aisle clearance on both sides of the island (36 to 48 inches each, depending on single or dual-cook use).
What’s left is your maximum island depth. Compare that number against the 10% rule to confirm the length works too.
Tape the footprint on your floor at full scale, raise a folding table to counter height inside the taped lines, and live with it for a few days before finalizing anything in stone.
Kitchen size | Suggested island footprint | Rule applied |
— | 4’ × 2’ cart or none | Under 10% cap |
— | 6’ × 3’ | Roughly at 10% |
— | 8’ × 4’ | Comfortably under 10% |
What Designers Learn From Building Real Islands
In real projects, the trade-off usually isn’t island size versus no island. It’s one large island versus two smaller ones, or maximum seating versus keeping clear sightlines to the stove. Designers who’ve run enough of these builds tend to favor mock-ups and phased sign-offs, taping the floor, testing the walk pattern for a week, before committing to stone or a fixed cabinet run.
A footprint that looks generous on a floor plan can feel tight the moment two people try to cook dinner around it. Testing the space with tape and a folding table catches that problem while it still costs nothing to fix.
Monarch carpenters approaches island planning the same way in its own residential projects across Singapore, treating the mock-up phase as a standard step rather than an optional extra before any custom carpentry begins. Readers weighing their own layout can review completed island projects for a sense of how footprint decisions play out in finished kitchens.
Accessibility and Universal Design for Kitchen Islands
An island built for one household member may not work for everyone who uses the kitchen, and universal design principles close that gap without sacrificing style.
Knee clearance under a seating overhang matters more than most homeowners expect. For anyone using a wheelchair or a seated position at the counter, you need a clear 27 to 30 inches of vertical knee space under the overhang, not just the standard 12 to 15 inches of horizontal overhang depth. That usually means dropping part of the island counter to 30 or 34 inches instead of the standard 36, creating a lower work zone alongside the higher counter.
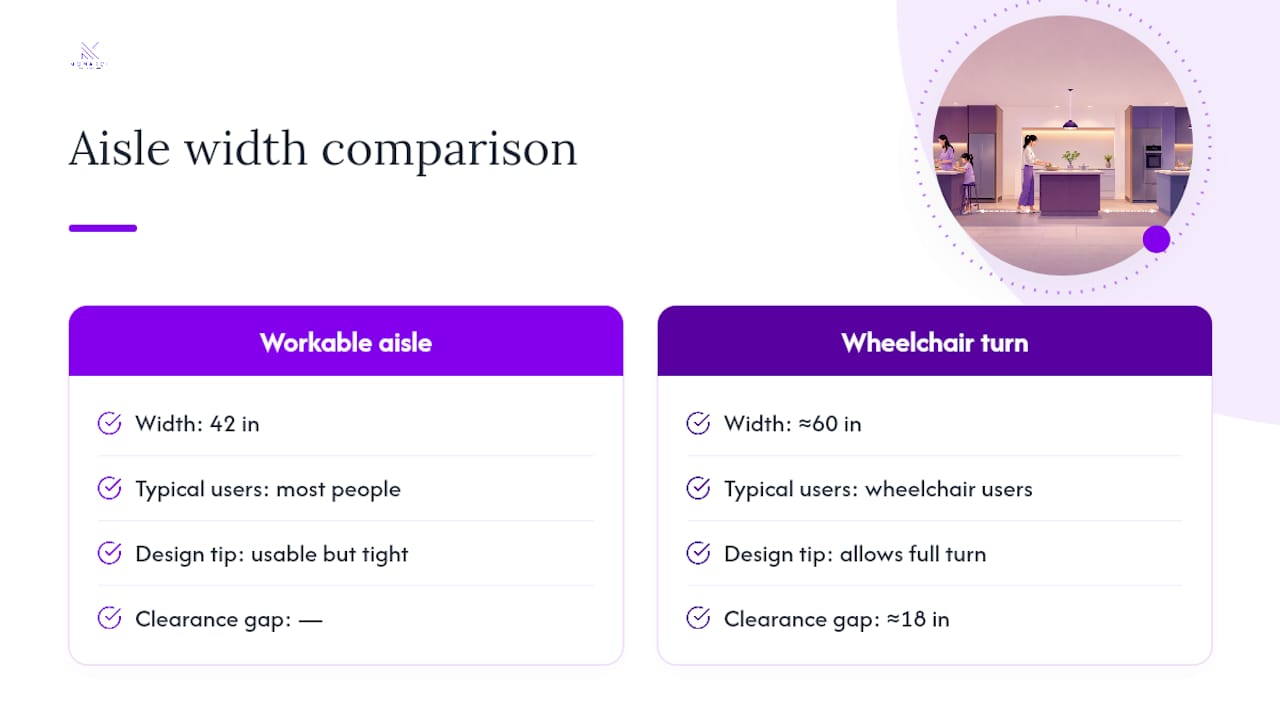
Aisle width becomes even more important for accessibility. A 42-inch aisle is workable for most people, but a wheelchair user generally needs closer to 60 inches to turn fully around, so if accessibility is a priority for your household, size your aisles at the upper end of the range or beyond it rather than the minimum.
Rounded corners instead of sharp edges reduce injury risk for kids and anyone with balance concerns, and lever-style or pull-style cabinet hardware is easier to operate than small knobs for people with limited grip strength. Outlets and switches mounted a bit lower, closer to 15 inches above the counter rather than tucked under upper cabinets, keep them reachable from a seated position too.
None of this requires a specialty island. It requires deciding these details during the planning phase, when adjusting a cabinet height or aisle width costs nothing extra, rather than after the layout is finalized.
Budget Considerations Tied to Island Size and Features
Bigger islands cost more, but not in a straight line. Cabinetry, countertop material, and labor scale with square footage, so an 8’ × 4’ island can easily run double or triple the cost of a 4’ × 2’ version, even before you add a sink or cooktop.
The features you build into the island often move the budget more than the footprint itself. A plain 6’ × 3’ island with cabinets and a countertop is a relatively contained cost. Add a sink, and you’re paying for plumbing rough-in, a faucet, and often a garbage disposal. Add a cooktop, and you’re paying for gas or electrical line work, ventilation, and typically a more expensive countertop material rated for heat near the burners.
Countertop choice swings the number significantly too, since a large island surface multiplies the price difference between a mid-range laminate and a slab of natural stone. If budget is tight, a common strategy is sizing the island generously for seating and storage while keeping the countertop material modest, then upgrading the surface later once the carpentry and utilities are locked in.
Storage-heavy islands with more drawers and pull-out shelving cost more in cabinetry labor than a simple island with a few open shelves, since drawer boxes and slides add both material and assembly time. If seating is your priority and storage is secondary, you can often trim a chunk of the budget by simplifying the storage side rather than shrinking the island’s overall length.
Storage Choices That Change With Island Size
A small 4’ × 2’ island typically has room for one bank of shelving or a single stack of drawers on one side, and that’s about it. There isn’t enough depth to run storage on both faces without losing knee room if seating is added later.
Medium islands around 6’ × 3’ open up real options. You can run drawers on one side facing the work zone and open shelving or cabinets on the seating side, giving you both closed storage for pots and pans and a spot to tuck cookbooks or serving pieces within reach of the table.
Large islands, 8’ × 4’ and up, can support a genuinely mixed storage plan: deep drawers for pots near the cooktop, a narrow pull-out for trays or cutting boards, a wine rack or open shelving facing a seating area, and even a dedicated trash and recycling pull-out built into the run. The extra depth also allows for double-sided cabinetry, storage accessible from both the work side and the seating side, which a smaller island simply doesn’t have the depth to support.
Drawers generally outperform cabinets with shelves for pots, pans, and small appliances, since you can see and reach everything without kneeling down to dig through a dark cabinet. Shelving still earns its place for items you want visible and easy to grab, like cutting boards or frequently used bowls.
Materials and Finishes for Every Island Size
Smaller islands can carry more dramatic material choices without overwhelming a budget, since less countertop and cabinetry area means the cost of a premium finish stays contained. A 4’ × 2’ cart in a bold painted cabinet finish or a striking quartz top is a manageable splurge precisely because there’s so little of it.
Large islands are where material choice needs the most restraint, simply because the sheer surface area magnifies both cost and visual weight. A busy, high-contrast stone pattern that looks striking on a small counter can feel overwhelming across an 8-foot slab. Many designers lean toward calmer, more consistent patterns, like quartz with subtle veining or a solid-color engineered stone, for larger island tops.
Cabinetry finish matters just as much as the countertop. A different cabinet color on the island than the surrounding perimeter cabinets is one of the most common ways to make an island feel like a deliberate design feature rather than an afterthought, and this works at almost any island size. For guidance on choosing between painted finishes, wood veneers, and laminate options for the cabinet boxes themselves, a closer look at cabinet material options is worth the read before finalizing your island design.
Durability should factor in heavily for islands used for both prep and dining, since the surface takes more abuse than perimeter counters. Quartz and solid stone resist scratching and staining well for high-traffic islands, while butcher block adds warmth but needs more regular maintenance if it’s doing double duty as a cutting surface.

When an Island Isn’t the Right Call
Not every kitchen should have one, and forcing an island into a space that can’t support proper clearances usually makes the kitchen feel smaller, not more functional.
If your kitchen can’t accommodate at least a 24-inch-deep by 48-inch-long footprint while still maintaining 36 inches of clearance on every side, a fixed island is often the wrong move, according to sizing guidance from Aedifex’s layout guide. That’s the practical minimum below which a cart or peninsula tends to serve you better.
A peninsula, an extension of your perimeter counter rather than a freestanding block, gives you extra prep surface and sometimes seating without needing clearance on all four sides. It only needs an aisle on one long side, which makes it a strong fit for galley kitchens or any room too narrow to fit a full island and still meet the 36-inch minimum on both sides.
A movable cart is the right call for kitchens that are tight but not impossible, or for renters and anyone not ready to commit to a fixed layout. You get extra counter space and storage that rolls out of the way when you need the floor clear, and it costs a fraction of built-in carpentry.
The decision really comes down to your room width math from earlier in this guide. If the numbers don’t clear 36 inches on every side of a fixed footprint, don’t force it. A peninsula or cart delivers most of the function without the layout compromise. Readers weighing a full renovation against smaller fixes may also find it useful to review kitchen layout planning approaches for new homes before deciding.
Lighting That Fits Your Island’s Size
Island lighting has one job that overhead kitchen lighting doesn’t handle well: lighting the work and dining surface directly without casting your own shadow across it as you stand there.
Pendant lighting is the standard choice, and the number of fixtures should scale with island length. A 4-foot island typically needs just one centered pendant, a 6-foot island usually looks and functions best with two, and an 8-foot or larger island often calls for three to maintain even light coverage across the whole surface.
Hanging height matters more than most homeowners plan for. Pendants generally hang 30 to 36 inches above the counter, low enough to focus light downward but high enough that nobody’s bumping their head reaching across for a serving dish. If your island doubles as a bar with 42-inch counter height, raise the pendant height to match so clearance above a seated head stays comfortable.
Dimmable fixtures earn their cost quickly on an island that serves both meal prep and dinner seating, since the bright, task-focused light you want while chopping vegetables is rarely the mood you want once people sit down to eat. Pairing pendants with under-cabinet lighting on the perimeter, rather than relying on the island fixtures alone, also helps eliminate shadows for anyone working at the sink or stove nearby.
Three Rules I Give Every Homeowner Before They Order Cabinets
Measure your clearances first, then set the island footprint. Too many homeowners pick a size they like and try to force the aisles to work around it, which is backward. Prioritize workflow, fridge to sink to cooktop, over squeezing in maximum seating; a cramped work triangle wears on you faster than one missing barstool ever will. And always test a full-scale mock-up before signing off on stone or cabinetry. Tape doesn’t lie the way a floor plan sometimes does.
— Seth Wayne
Working With a Design-Build Studio for Your Island
A design-build studio handles what a floor plan alone can’t: a site survey to confirm your real clearances, a taped mock-up you can walk through before committing, and the carpentry and trade coordination, electrical, plumbing, ventilation, all under one roof instead of three separate phone calls. That coordination is where island projects usually go sideways when handled piecemeal.

Custom kitchen islands designed and built by a specialized carpentry studio often receive positive client feedback for design quality and cost effectiveness compared to typical bespoke carpentry pricing. If you’re weighing a fixed island against a peninsula or cart, or you already know you want a full custom build, browsing Monarch’s project portfolio is a solid next step. For homeowners further along in planning the rest of the renovation, the kitchen remodel checklist for homeowners is a useful companion for coordinating trades alongside your island build. Reach out to request a consultation and get your specific kitchen measured before you commit to a footprint.
Sources
FAQ
Is a 7-foot island too small?
No, a 7-foot island is on the larger end of the medium range and comfortably seats three people; it only becomes tight if you’re also trying to fit a sink, cooktop, and four barstools on the same run.
Can a kitchen island be 24 inches wide?
Yes, but 24 inches is close to the practical minimum depth, workable as a narrow prep island or cart without seating, though anything narrower usually can’t support comfortable clearance for cooking tasks.
What is the standard size of an island?
There’s no single fixed standard, but 6’ × 3’ at 36 to 42 inches deep is the most common footprint recommended for average-sized American kitchens.
Recommended
Comments