
What Is a Renovation Mood Board? A Singapore Guide


TL;DR:
A renovation mood board visually communicates your home’s desired look to prevent misunderstandings and costly rework.
Creating a focused board with 2-4 core colors and materials helps unite your design vision and guides contractor decisions.
A renovation mood board is defined as a curated visual collection of images, colors, textures, and material samples that communicates your home’s desired look and feel before a single wall is touched. Interior designers call this tool a “design board” in professional practice, and both terms describe the same concept. A well-built mood board acts as a shared visual language between you and your contractor, replacing vague words like “modern” or “warm” with concrete references that leave no room for guesswork. For Singapore homeowners planning a renovation, this single document can prevent costly rework and keep your project on track from day one.
What is a renovation mood board and what goes into one?
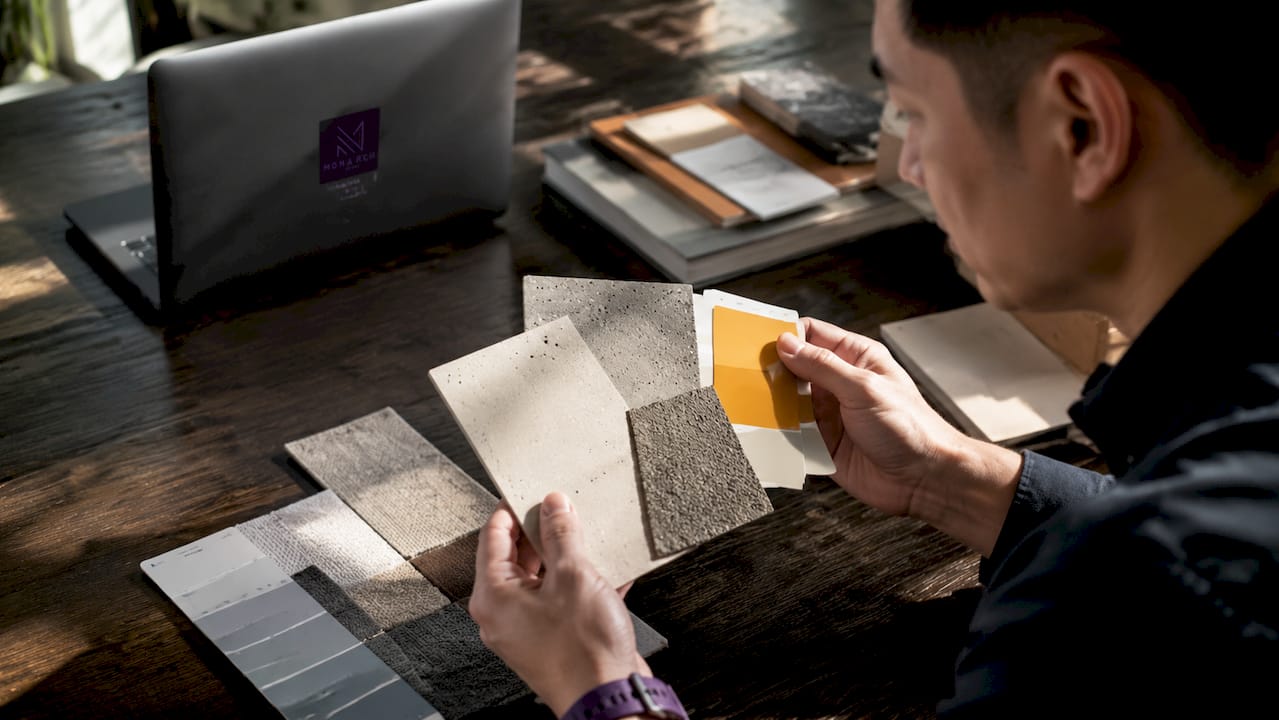
A renovation mood board is a curated visual collection that typically includes 2–4 core colors and 1–2 dominant materials to maintain visual coherence. That limit is deliberate. When you restrict your palette and material choices, every element on the board pulls in the same direction, making your design intent unmistakable to anyone who looks at it.
The most effective boards combine several types of content:
Color swatches: Paint chips or digital hex codes representing your primary, secondary, and accent tones
Material samples: Timber finishes, stone veneers, tile textures, or fabric swatches that define surface quality
Style images: Photographs of rooms, furniture, or architectural details that capture the emotional feel you want
Finish references: Hardware, lighting fixtures, and fittings that tie the scheme together
The table below shows how digital and physical board components differ in practice:
Component | Digital board | Physical board |
Color references | Hex codes, digital swatches | Painted chips, printed samples |
Material feel | Photos of textures | Actual fabric, tile, timber pieces |
Style images | Pinterest pins, saved photos | Printed cutouts, magazine clippings |
Editing ease | Instant drag-and-drop | Requires physical rearrangement |
Lighting accuracy | Screen-dependent | Assessed under real room light |
Random “pretty picture” pinning without a clear scheme in mind is the most common mistake homeowners make. It produces a cluttered board that confuses rather than guides. Stick to one emotional direction per board, whether that is calm and minimal or warm and layered, and edit ruthlessly from there.
How do you create a renovation mood board step by step?
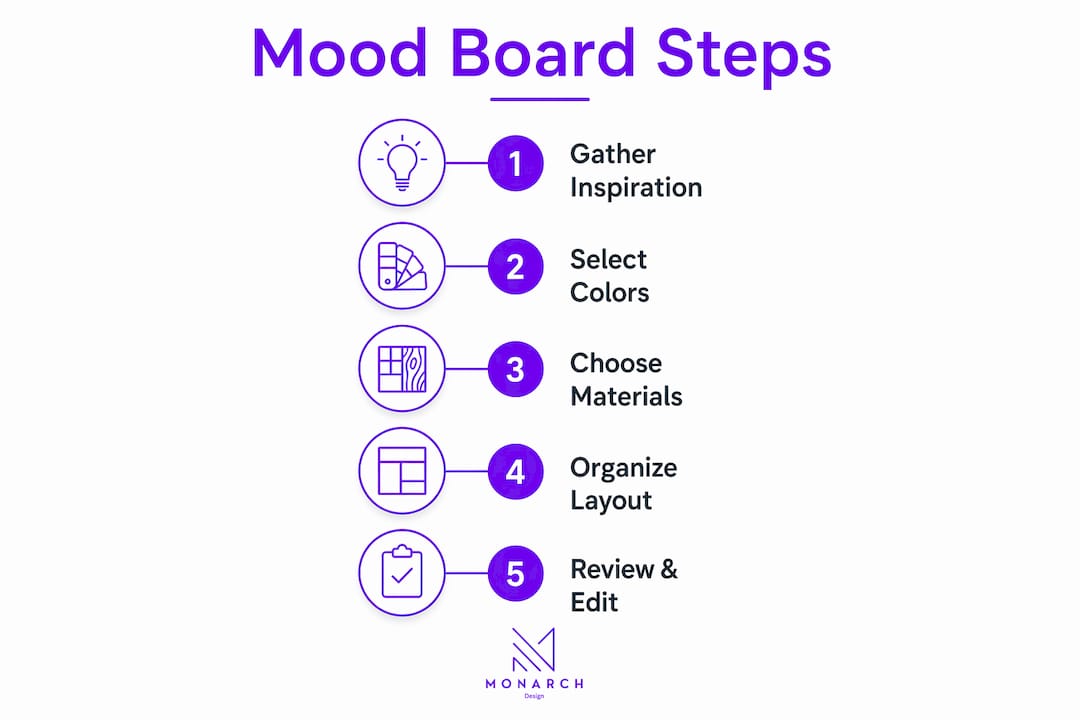
Creating a design board follows a five-step workflow that moves from broad inspiration to specific material decisions. Common tools include Pinterest, Canva, and physical corkboards, and most projects benefit from 3–5 rounds of editing before the board is ready to share with a contractor.
Gather inspiration broadly. Save images from Pinterest, Instagram, design magazines, and showroom visits without filtering yet. Cast a wide net at this stage.
Edit down to your core direction. Remove anything that does not share the same emotional tone. If 80% of your saved images are light and airy, the two dark moody shots probably do not belong.
Identify your core elements. Pull out the 2–4 colors and 1–2 materials that appear most consistently across your shortlisted images. These become your non-negotiables.
Build your layout. Arrange your chosen images, swatches, and material references in a single view. Use Canva for a clean digital grid or a corkboard for a tactile, hands-on layout.
Add physical material swatches. Order or collect actual samples of your chosen tiles, timber, or fabric. Pin them alongside your images to complete the board.
Pro Tip: When editing your board, ask yourself: “Does this image share the same color temperature and material weight as the others?” If the answer is no, remove it. One mismatched image can pull a contractor’s eye in the wrong direction.
Platforms like Milanote work well for homeowners who want to organize images, color notes, and links in one digital workspace. Pinterest is better for the early inspiration phase, while Canva suits those who want a polished, shareable layout. For new home interior design planning, starting your board at least four to six weeks before contractor meetings gives you enough time to iterate properly.
Why does a renovation mood board improve project outcomes?
A mood board functions as a project management tool, not just a style exercise. Mood boards reduce misunderstandings by providing a visual reference for subjective terms like “modern” or “warm,” which can mean entirely different things to a homeowner and a contractor. That shared reference point directly reduces expensive design conflicts and rework.
The practical benefits extend well beyond aesthetics:
Benefit | Practical outcome |
Reduces decision fatigue | You make fewer on-the-spot choices during construction |
Maintains design consistency | Every room decision references the same visual standard |
Minimizes contractor miscommunication | Contractors see exactly what “warm timber” or “matte finish” means to you |
Preserves heritage character | Keeps overarching vision consistent in older or character properties |
Reduces renovation anxiety | Frequent reference to the board maintains confidence during disruptive build phases |
Singapore’s older HDB flats and conservation shophouses present a specific challenge: balancing modern living requirements with existing architectural character. A mood board helps preserve design integrity in these properties by keeping the overarching vision consistent even as individual decisions shift. For a living room renovation, a well-maintained board can be the difference between a cohesive result and a space that feels assembled rather than designed.
The psychological benefit is real too. Construction phases are disruptive and visually chaotic. Returning to your mood board reminds you of the goal and keeps confidence steady when the space looks nothing like the finished product yet.
Digital vs physical mood boards: which format should you use?
Digital and physical mood boards serve different purposes, and the most effective approach uses both in sequence. Digital boards excel for brainstorming, while physical boards are better for final material selection under real light. That distinction matters because natural light changes how paint colors and material finishes appear dramatically from room to room.
Digital board strengths:
Fast to build and easy to edit at any stage
Simple to share with designers, contractors, and family members
Searchable and linkable to product pages and specifications
Ideal for the early ideation and inspiration phase
Physical board strengths:
Lets you feel actual material weight, texture, and sheen
Allows color and finish assessment under your home’s specific lighting
Easier to spot clashes between materials when they sit side by side
More effective for final sign-off decisions before purchasing
Pro Tip: Bring your physical material swatches into the actual room where they will be used. Hold paint chips against your wall at different times of day. A color that looks perfect in a showroom can read completely differently under Singapore’s strong afternoon sun.
Professional renovators consistently move from digital ideation to physical boards for final decisions. The recommended workflow is to start with a digital board on Pinterest or Canva, narrow your choices to a shortlist, then build a physical board with real samples before committing to purchases. Understanding how interior lighting interacts with your chosen materials is a critical step that only a physical board can fully reveal. For color psychology decisions specifically, seeing swatches under your actual room light is non-negotiable.
Key Takeaways
A renovation mood board is the single most effective tool for aligning your design vision with your contractor’s execution before work begins.
Point | Details |
Core composition | Limit boards to 2–4 colors and 1–2 dominant materials to maintain clarity. |
Five-step process | Gather broadly, edit ruthlessly, identify core elements, build layout, add physical swatches. |
Communication value | Visual references eliminate subjective misunderstandings that cause costly rework. |
Digital then physical | Start ideation digitally, finalize material decisions with physical samples under real light. |
Evolving document | Update your board as new constraints or opportunities arise during construction. |
Why I tell every Singapore homeowner to start with a mood board
Working with Singapore renovations, I have seen the same pattern repeat itself. Homeowners arrive with a clear feeling in mind but struggle to put it into words. They say “Scandinavian but warmer” or “modern but not cold,” and contractors nod along while picturing something completely different. The mood board closes that gap in a way that no conversation can.
What surprises most homeowners is that mood boards are flexible documents, not finished products. The best ones I have seen evolve through the renovation as homeowners learn more about materials, costs, and spatial constraints. Treating your board as a living reference rather than a locked-in plan removes a lot of pressure and actually produces better results.
The other thing I would push back on is the idea that mood boards are only for large, complex renovations. Even a single-room refresh benefits from a focused board. It forces you to make decisions in advance rather than under pressure on-site, where rushed choices almost always cost more. Maintaining an accessible mood board throughout the build lets you make timely tweaks as new constraints appear, rather than scrambling to course-correct after materials have been ordered.
My honest advice: build your board before you meet a single contractor. Walk in with it. The quality of the conversation changes immediately.
— Seth Wayne
How Monarch carpenters helps you bring your mood board to life
Monarch carpenters has built a reputation among Singapore homeowners for delivering quality design at a cost that does not require compromise. Clients consistently highlight the studio’s ability to take a rough mood board and translate it into a finished space that matches the original vision, often at a price point that surprises them.
The in-house team of designers and carpenters at Monarch carpenters works closely with homeowners from the mood board stage through to final installation. Whether you arrive with a polished design board or a folder of saved images, the team helps refine your direction and select materials that fit both your aesthetic and your budget. Explore Monarch carpenters’ interior design services to see how their collaborative process turns renovation inspiration boards into spaces that are beautiful, practical, and built to last.
FAQ
What is the difference between a mood board and a design board?
A mood board and a design board refer to the same tool. “Design board” is the more formal industry term, while “mood board” is the common everyday phrase used by homeowners and DIY renovators.
How many images should a renovation mood board include?
A focused mood board typically contains enough images to show 2–4 core colors, 1–2 dominant materials, and the overall emotional feel, usually between 8 and 15 images total. More than that risks visual clutter and loss of direction.
Can I create a mood board without design experience?
Yes. Tools like Pinterest and Canva require no design training and are built for exactly this purpose. Start by saving images that feel right, then edit down to a consistent theme before sharing with your contractor.
Why is a physical mood board better for final material decisions?
Natural light changes how paint colors and material finishes appear, and a screen cannot replicate that. Holding actual swatches in your room under real lighting conditions is the only reliable way to confirm your final material choices.
How often should I update my mood board during a renovation?
Update your board whenever a significant constraint or opportunity changes your direction, such as a material going out of stock or a budget shift. Keeping it current means every decision still references a coherent vision rather than an outdated one.
Recommended
Comments