
Seal Seams First: Carpenter Backed Under Sink Cabinet Waterproofing
- Monarch

- 4 hours ago
- 11 min read
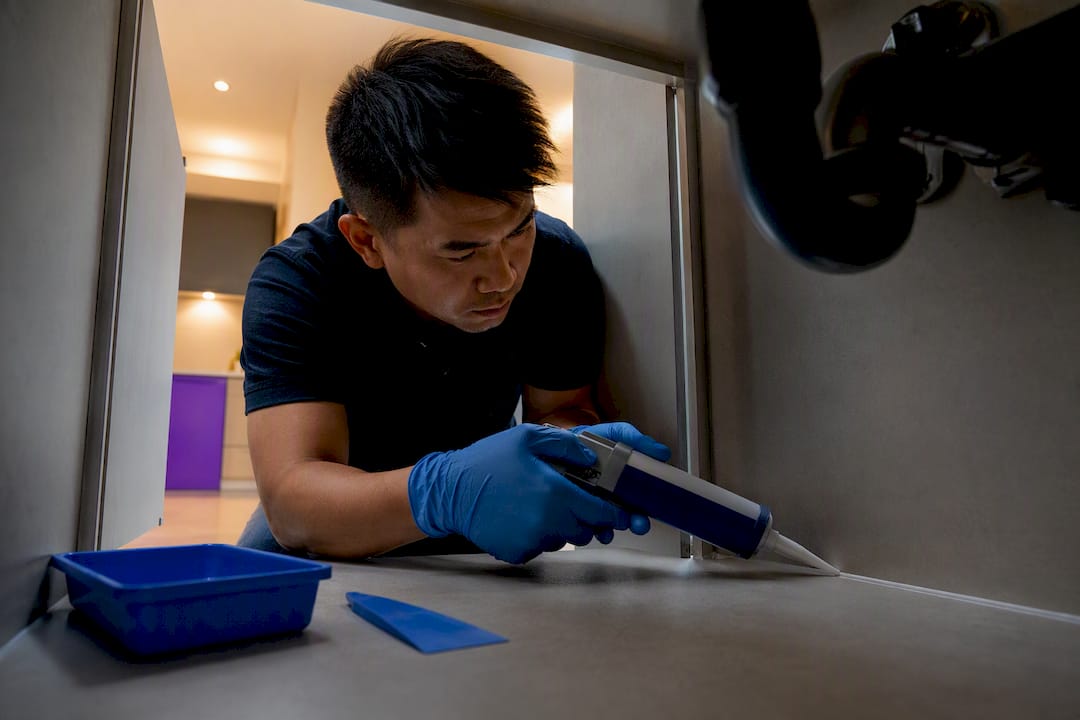
The fastest, most reliable way to handle under sink cabinet waterproofing is to seal every seam and pipe penetration with 100% kitchen or bath silicone, then add a waterproof mat or drip tray for containment and leak detection. Sealant blocks moisture from soaking into the wood in the first place, while the tray or mat catches whatever a slow drip misses and shows you the problem before it spreads. Start by emptying the cabinet, letting it dry completely, and inspecting every seam and pipe entry for gaps or old, cracked caulk.
TL;DR:
Proper sealing with 100% silicone on all seams and pipe penetrations is essential to prevent moisture ingress and extend cabinet lifespan.
Selection of containment materials, such as flexible drip trays or high-walled mats, depends on leak detection priorities and volume containment needs.
Inspect under sink cabinets every six months for cracks, mold, or soft spots, especially after plumbing work, to catch problems early.
Damaged or water-logged cabinet floors require repair with moisture-resistant plywood or full replacement rather than simple sealing.
Professionals are necessary when structural rot, extensive mold, or water damage beyond the cabinet floor is present, to ensure a safe, lasting fix.
Table of Contents
What Materials Do You Need for Under Sink Cabinet Waterproofing?
How Do You Waterproof a Cabinet Under the Sink Step by Step?
How Often Should You Inspect Under Sink Cabinets for Water Damage?
Why Homeowners Trust Monarch Carpentry Design Studio for Cabinet Repairs
What Do Carpenters Wish Every Homeowner Knew About Under Sink Waterproofing?
Get Professional Waterproofing and Cabinet Repair From Monarch Carpenters
What Materials Do You Need for Under Sink Cabinet Waterproofing?
Most DIY waterproofing failures come down to using the wrong sealant or skipping containment altogether. Get the materials right and the rest of the job is mostly patience.
100% silicone, not latex caulk or “paintable” sealants, is the baseline. Kitchen and bath formulations cure into a flexible, mildew-resistant bond that moves with wood as it expands and contracts, and holds up against dish soap, bleach spray, and the occasional drain cleaner spill. A layered approach that combines sealed seams with a secondary liner is what actually holds up over years, not just months, because no single layer catches everything a busy kitchen throws at it.
Trays and mats solve different problems, and picking the wrong one for your situation defeats the purpose.
Flexible trim-to-fit drip trays funnel water forward so you spot a leak fast; some hold roughly 1 to 1.5 quarts before overflowing, which is plenty of warning for a slow supply-line drip.
High-walled silicone mats contain more volume (some hold up to 2.2 gallons in certain designs) but can mask a small leak until the mat fills, so they suit renters or households that prioritize spill containment over early warning.
Rigid trim-to-fit liners, often sold in standard widths around 27 to 30 inches, resist common household chemicals and wipe clean easily, according to WeatherTech’s SinkMat product specs.
If the cabinet floor is already soft or delaminating, plan for repair materials, not just protection. Exterior-grade or marine-grade plywood, sometimes labeled ACX, resists moisture far better than the particleboard or MDF most stock cabinets ship with. Particleboard swells permanently once it absorbs water; plywood can dry out and stay structurally sound.
Your tool list stays simple:
Caulking gun (skeleton frame, not the cheap push-style)
Plastic or silicone smoothing tool (a wet finger works in a pinch, but tooling with a dedicated tool gives a cleaner, longer-lasting bead)
Isopropyl alcohol and clean rags for surface prep
Utility knife for trimming old caulk and cutting liners to fit
Backer rod for any gap wider than a standard bead can bridge
That backer rod matters more than most guides admit. For oversized or irregular gaps around pipe penetrations, pressing in a foam backer rod before laying silicone over it creates a watertight joint that a thick bead alone won’t achieve, since silicone shrinks slightly as it cures and needs something to bond against on both sides.
Pro Tip: Buy one extra tube of silicone even if you think you’ll only need one. Sealant that sits open for more than a day forms a skin and won’t tool cleanly, so having backup avoids a second trip to the hardware store mid-project.
How Do You Waterproof a Cabinet Under the Sink Step by Step?
This is the sequence that turns a weekend chore into a durable fix, not a repeat job next spring.
1. Shut off water and clear the cabinet. If you’re removing old plumbing hardware or working near a supply line, shut off the valves first. Pull everything out, including any shelf liner, and set it aside.
2. Let the cabinet dry fully. Run a fan or dehumidifier for a few hours if there’s any residual dampness. Sealing over trapped moisture just locks mold in rather than keeping it out.
3. Inspect thoroughly before you touch a caulk gun. Walk the cabinet floor and walls looking for:
Soft, spongy spots on the floor or side panels
Dark staining or a musty smell (early mold signs)
Cracked, yellowed, or peeling caulk around existing seams
Gaps where pipes pass through the back or side panel
Most people focus their sealing effort on the visible cabinet floor and miss the joints that actually fail first. The rear wall penetration and the floor-to-side panel seam are the most common failure points, not the open floor space. Prioritize those two areas even if they’re harder to reach.
4. Remove old sealant completely. Score along the edge of any existing caulk with a utility knife and peel it away. Wipe the surface with isopropyl alcohol to strip oils and residue; silicone won’t bond well to a dirty or greasy substrate.
5. Install backer rod on wide gaps. Anywhere a pipe penetration or seam gap exceeds about a quarter inch, press foam backer rod into the space before sealing.
6. Apply the silicone bead. Cut the tube tip at a low angle for a thin, controlled bead. Run it continuously along the seam, around each pipe penetration, and up the back corner where the floor meets the wall.
7. Tool the bead immediately. Use your smoothing tool (or a gloved, wet finger) to press the silicone into the joint and smooth the surface. Tooling the bead rather than leaving it as a raised ridge dramatically improves how well it adheres and how long it lasts, and it looks far more finished besides.
8. Let it cure per the label, usually 24 hours minimum. Don’t rush this. A tray or mat set on top of uncured silicone can smear the bead and leave gaps you won’t notice until they leak.
9. Cut and install your tray or mat. Trim-to-fit trays and mats are designed to be scored and cut with scissors or a utility knife to match your cabinet’s exact footprint. If you’re using a rigid tray, run a thin bead of silicone around its perimeter to lock it in place and stop water from sliding underneath. Leave clear access around the shutoff valves; you don’t want to cut into a tray every time you need to service the plumbing.
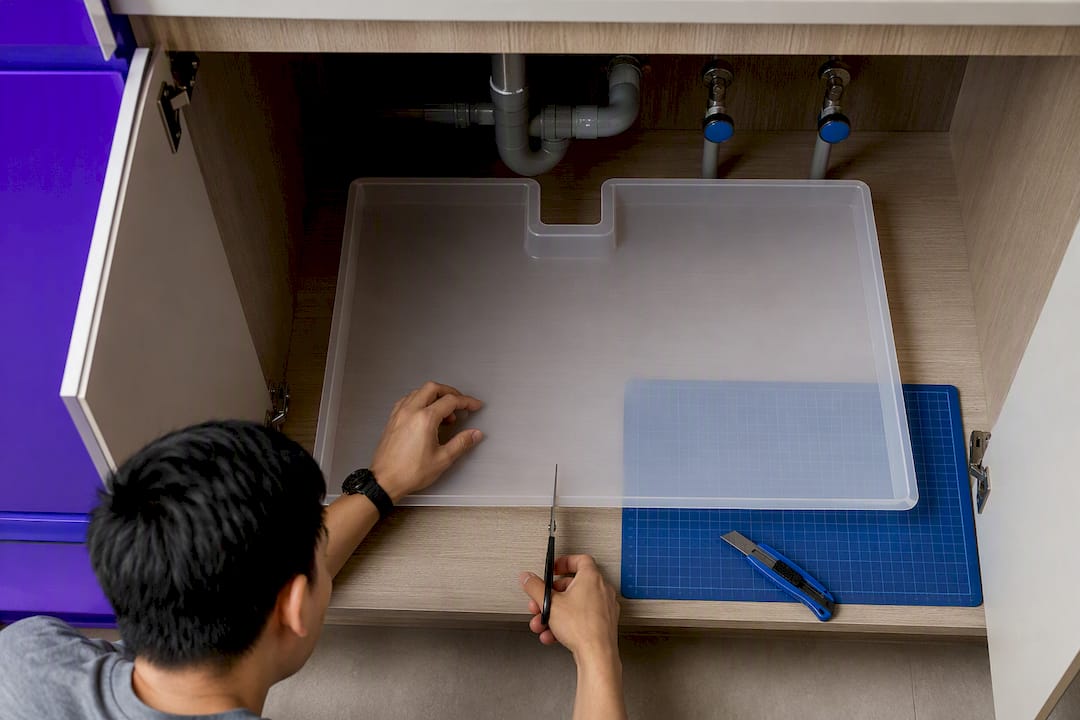
10. Re-check after 24 hours. Look at the cured bead for any spots that pulled away or didn’t bond. Run a hand along every seam. It’s far easier to add a touch-up bead now than to discover a gap during your next inspection cycle.
11. Document what you did. A quick phone photo of the sealed seams and installed tray, dated, gives you a baseline to compare against during future checks.
When Should You Repair or Replace a Damaged Cabinet Floor?
Sealing and containment only work on a sound cabinet floor. If the wood is already compromised, no amount of silicone fixes structural damage underneath it.
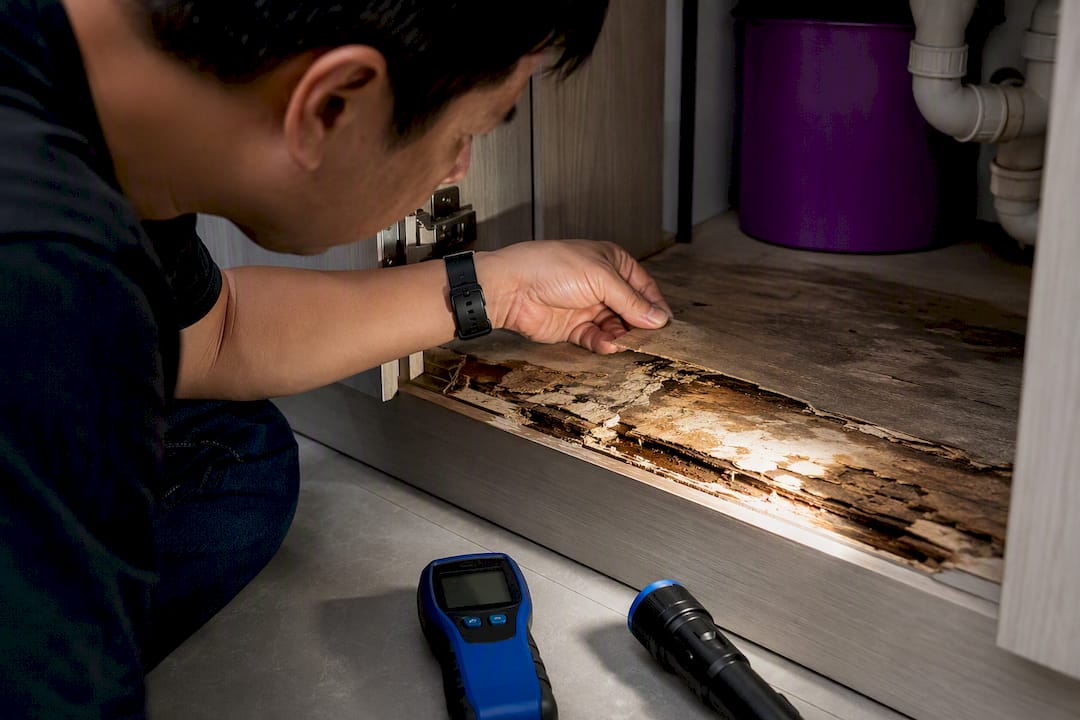
Start by probing the suspect area with a screwdriver or awl. Wood that dents easily, feels spongy, or crumbles at the edges has already absorbed water past the point of simple sealing. Check for delamination, where the surface layers of particleboard or plywood separate and swell, and look closely for mold, which often shows up as dark speckling along the back corners before it’s visible anywhere else.
Your options scale with the severity of what you find:
Minor swelling, no rot: Sand the affected area smooth, seal it thoroughly with silicone, and install a rigid tray over the top as a barrier layer.
Localized soft spots: Cut out the damaged section and patch with an exterior-grade plywood insert, sealed on all faces with polyurethane before installation.
Widespread delamination or a fully compromised floor: Replace the entire cabinet floor. The recommended repair approach uses ACX or marine-grade plywood sealed on every face with a water-resistant polyurethane, fastened with stainless or coated screws, then finished with a continuous silicone bead around the perimeter to create what amounts to a built-in sink tray.
A quality water-resistant wood finish makes a real difference here. Polyurethane rated for moisture exposure, applied to all six sides of a plywood panel including the edges, resists reabsorption far longer than a single coat on just the visible face. Skipping the underside or edges is the single most common mistake in DIY overlay repairs.
Visible mold beyond a small surface spot, a musty odor that won’t clear after drying, or rot that’s spread into the cabinet’s structural frame are your signals to stop the DIY approach and call a professional. Mold remediation and structural carpentry both require tools and judgment that go beyond a caulking gun. If you’re weighing full replacement anyway, it’s worth comparing kitchen cabinet material options before you commit to another particleboard base that will face the same risk down the line.
How Often Should You Inspect Under Sink Cabinets for Water Damage?
A six-month habit prevents almost every expensive repair on this list. Waiting until you notice a smell or a stain means the damage has usually been building for weeks.
Set a recurring reminder to inspect under sink cabinets regularly, and always check again after any plumbing work, even a simple faucet swap. Experts point to this window because sealant cracking, early mold growth, and material swelling are all detectable well before they become structural problems, but only if someone actually looks.
Your inspection routine doesn’t need to be complicated:
Run a hand along every silicone seam, feeling for cracks or lifted edges.
Check pipe connections and shutoff valves for corrosion or dampness.
Lay a dry paper towel on the cabinet floor overnight and check it in the morning for any dampness you can’t see.
Look at your tray or mat for standing water, discoloration, or mineral buildup that suggests a slow, ongoing drip.
Here’s the trade-off worth understanding before you buy: high-walled mats hide small leaks until they accumulate enough volume to notice, while sloped drip trays are built to expose a leak early by guiding water toward the front edge where you’ll actually see it. If your priority is catching problems fast, the sloped tray design wins. If your priority is maximum containment regardless of detection speed, a deep-walled mat makes more sense, provided you check it on schedule rather than assuming it’s handling things silently.
Minor issues, a slightly lifted bead of caulk, a tray with a little dust, can wait for your next scheduled check. Active dampness, a musty smell, or any soft spot on the cabinet floor needs attention immediately, not at the next six-month mark.
Why Homeowners Trust Monarch Carpentry Design Studio for Cabinet Repairs
DIY sealing and containment solve most under sink problems, but some situations call for a carpenter’s eye and a team that’s built cabinetry for a living. Monarch Carpentry Design Studio has built a reputation across residential, commercial, and hospitality projects in Singapore on a straightforward premise: thoughtful design and precise craftsmanship don’t have to come with an inflated price tag. Clients consistently point to the same combination in their feedback, elegant, functional results delivered at a cost that respects the budget they came in with.
Our in-house team of designers and carpenters handles cabinetry work the way we handle every project, collaboratively and with attention to details that get overlooked in a rushed repair. When a homeowner brings us a water-damaged cabinet base, we’re not just patching a floor. We’re assessing whether the surrounding cabinetry, the countertop seal, and the plumbing access all work together the way they should.
Certain scenarios call for a professional rather than another weekend of DIY:
Rot has spread beyond the cabinet floor into structural framing or adjoining cabinets.
Mold coverage is extensive enough that surface cleaning won’t fully resolve it.
You’re already considering a full cabinet replacement or a broader kitchen refresh.
Repeated leaks suggest a plumbing issue beyond a simple gasket or supply line fix, in which case pairing our carpentry work with a trusted plumber makes more sense than tackling it solo.
If you’re at the point of asking whether repair or replacement makes more sense long term, our guide to kitchen cabinet customization walks through what a rebuilt base cabinet can look like when it’s designed to resist the exact problem you just fixed.
What Do Carpenters Wish Every Homeowner Knew About Under Sink Waterproofing?
The mistake I see most often isn’t laziness, it’s misplaced confidence in a single product. Homeowners buy a nice mat, drop it in the cabinet, and consider the job done. A mat is a backup plan, not a defense. It catches what a proper seal should have stopped in the first place, and if you skip the sealing step, you’re just delaying the moment you discover a problem, not preventing one.
The second mistake is sloppy tooling. A thick, unsmoothed bead of silicone looks like more protection, but it actually traps air pockets and adheres worse than a thin, properly tooled line. And almost everyone forgets the back wall. Pipe penetrations against the rear panel take the least attention and cause the most damage, because nobody’s looking back there until something smells wrong.
If you take one habit from this guide, make it this: seal your seams properly, using backer rod where gaps call for it, and put a real inspection on your calendar every six months. That single habit prevents more damage than any product you could buy.
— Seth Wayne
Get Professional Waterproofing and Cabinet Repair From Monarch Carpenters
If your under sink cabinet has moved past the DIY stage, rot in the framing, mold that keeps coming back, or a floor too soft to patch, Monarch carpenters gives you a faster, more permanent fix than another round of caulk and trays. We handle sealed cabinet installations, moisture-resistant floor replacements using proper exterior-grade materials, and full project management if the repair opens the door to a broader kitchen update.

Our team builds every repair the way we build a full renovation: with in-house designers and carpenters who coordinate the details so you’re not managing multiple contractors for one cabinet base. Clients come back to us because the craftsmanship holds up and the pricing stays honest, no surprise costs once the drywall is opened up. If you’re weighing a bigger kitchen project alongside the repair, our renovation planning checklist is a useful next stop. Otherwise, reach out through Monarch Carpentry Design Studio to schedule a site inspection and get a straightforward quote on what your cabinet actually needs.
Where This Guide’s Recommendations Come From
The sealing and inspection guidance here draws on documented cabinet-care standards rather than guesswork, and pairing DIY steps with real product specs keeps the advice grounded in what actually works long term.
GE Sealants provided the sealing technique and 6 to 12 month inspection interval used throughout this guide.
Rev‑A‑Shelf’s flexible drip tray specifications informed the tray-versus-mat capacity and detection comparisons.
WeatherTech’s SinkMat product details supported the trim-to-fit and chemical-resistance points in the materials section.
Rapidrepair shaped the plywood overlay and polyurethane sealing recommendations for damaged floors.
Sources
FAQ
What Is the Best Sealant for an Undermount Sink?
A 100% silicone sealant labeled for kitchen and bath use is the standard choice, since it stays flexible, resists mildew, and bonds well to both the sink rim and the countertop material around it.
Can You Seal Underneath Kitchen Cabinets?
Yes, and you should. Sealing the seams and pipe penetrations on the cabinet floor and back panel with silicone is the single most effective step in under sink cabinet waterproofing, since it stops moisture before it reaches the wood.
What Should You Put Under the Sink to Protect the Cabinet?
Use a trimmable drip tray or a raised-edge silicone mat as a second layer of protection after sealing. Trays reveal leaks faster by funneling water forward, while high-walled mats contain more volume but require more frequent checking.
What Can You Put Under a Sink to Prevent Water Damage?
Combine sealed seams with a waterproof mat or tray, and check both every 6 to 12 months. If the cabinet floor is already damaged, an exterior-grade plywood overlay sealed with polyurethane restores a moisture-resistant surface before you add the tray on top.
When Should You Call a Professional Instead of DIY?
Call a professional like Monarch carpenters when you find structural rot, extensive mold, or damage that’s spread beyond the cabinet floor into adjoining framing. Those situations need carpentry expertise and, sometimes, mold remediation that goes past what caulk and a tray can fix.
Recommended
Comments